
Step-by-Step Guide to Creating an AI Voice Agent
How to set up an AI agent, Custom AI assistant for inbound calls, AI agent knowledge base configuration, AI business call automation guide.

AI Voice Agent can be a game-changer for your business. Although creating a system that autonomously answers phone calls, understands queries, and takes actions in real-time may seem complex and costly, it can be achieved in minutes using no-code platforms with a few steps, more like logging into a website or an online portal. The following article provides a detailed and comprehensive, easy-to-follow guide in five steps for business owners on how to exactly set up an AI assistant to handle inbound and outbound calls.
Six Steps Guide to Creating an AI Voice Agent
The process of initiating an AI voice agent for a business is simple and just a few clicks. The following steps reflect the standard configuration flow found in contemporary AI voice agent platforms. Each stage is discrete, purposeful, and, crucially, reversible; nothing is set in stone until you choose to go live.
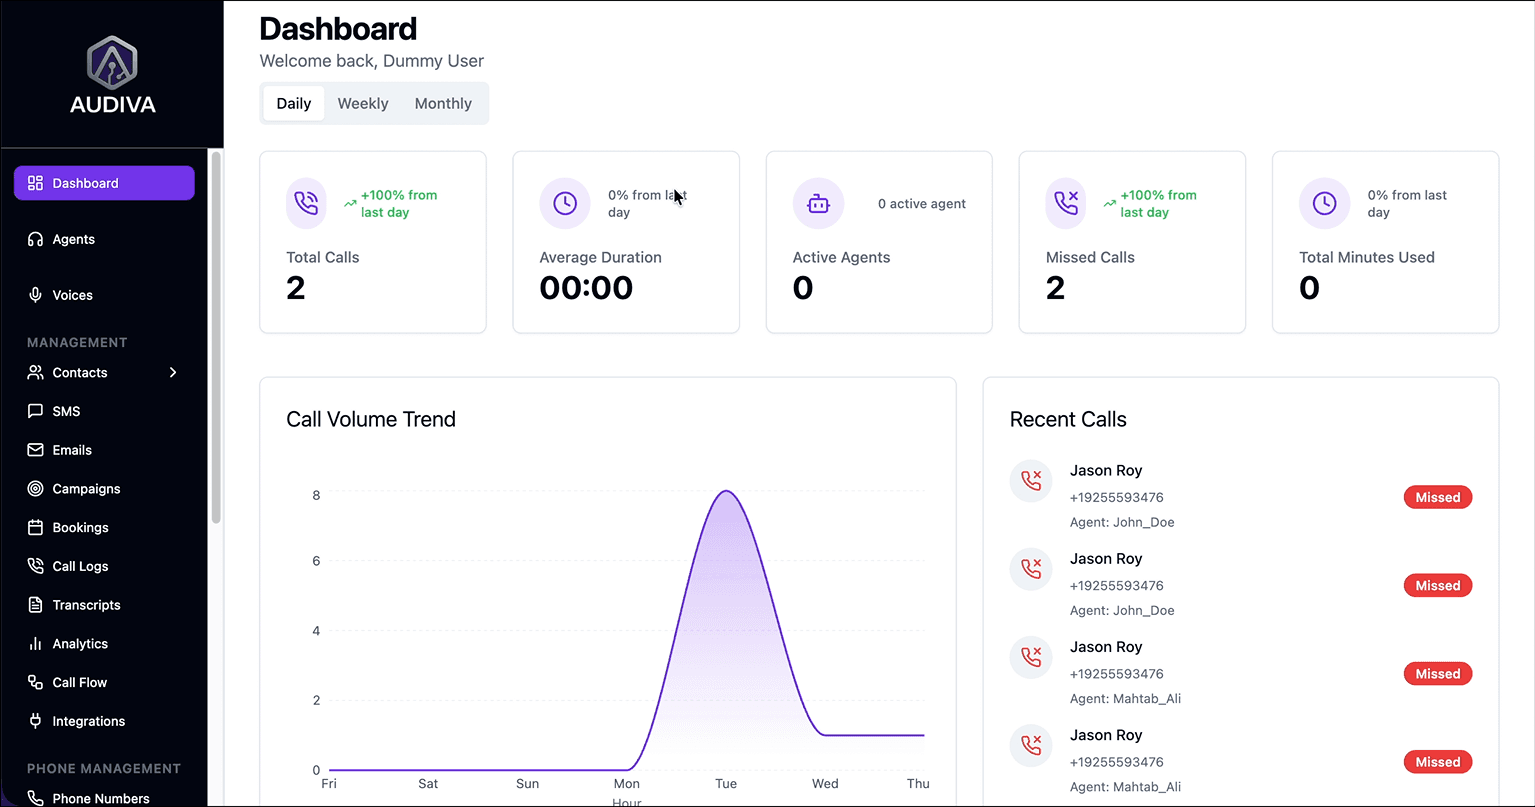
1. Step 1: Introduction to the AI Agent Dashboard
In the first step, you are supposed to log in to an AI Agent dashboard. In Audiva AI, the process is very simple. Just log in to your platform and locate the Agents section in the left-hand navigation panel. This is your command center: a clean interface from which all subsequent configuration unfolds. It provides all the progress of your business handled through the AI agent, including total calls, missed calls, call durations, etc.
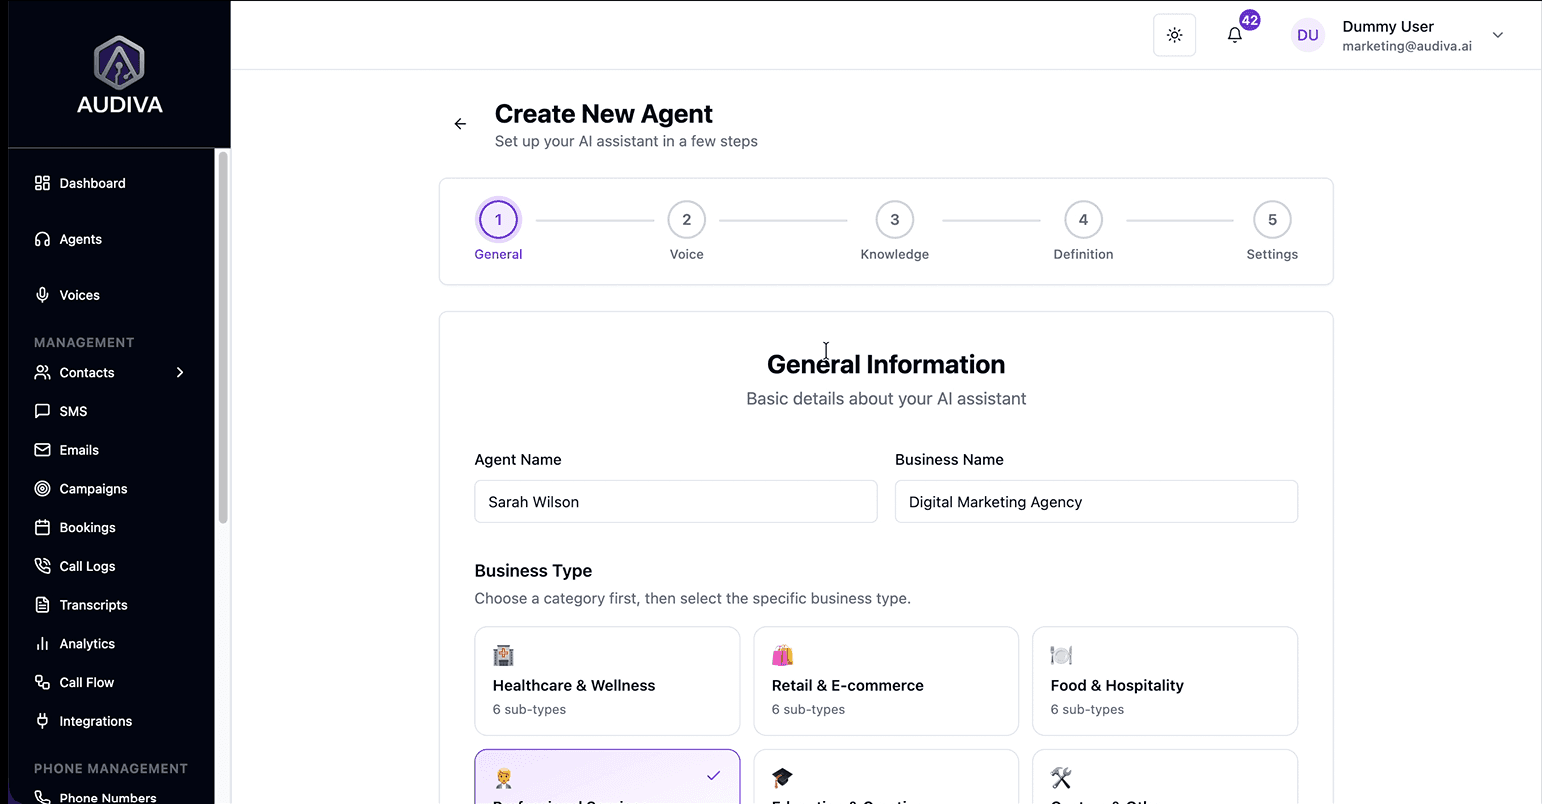
2. Step 2: General Information & Business Identity
Once reached the dashboard, fill the form with basic information about your business. The process is closer to filling out a detailed online form than to writing code, which is precisely the point. So, first, assign the agent a name, something your customers will hear and remember, and input your business name. Then, select from available industry categories and subcategories to orient the system toward your sector's conventions and terminology. Crucially, you'll also define the agent's operational mandate: does it receive calls, initiate them, or do both? An inbound-only agent is your receptionist; an outbound-capable agent is also your follow-up specialist.

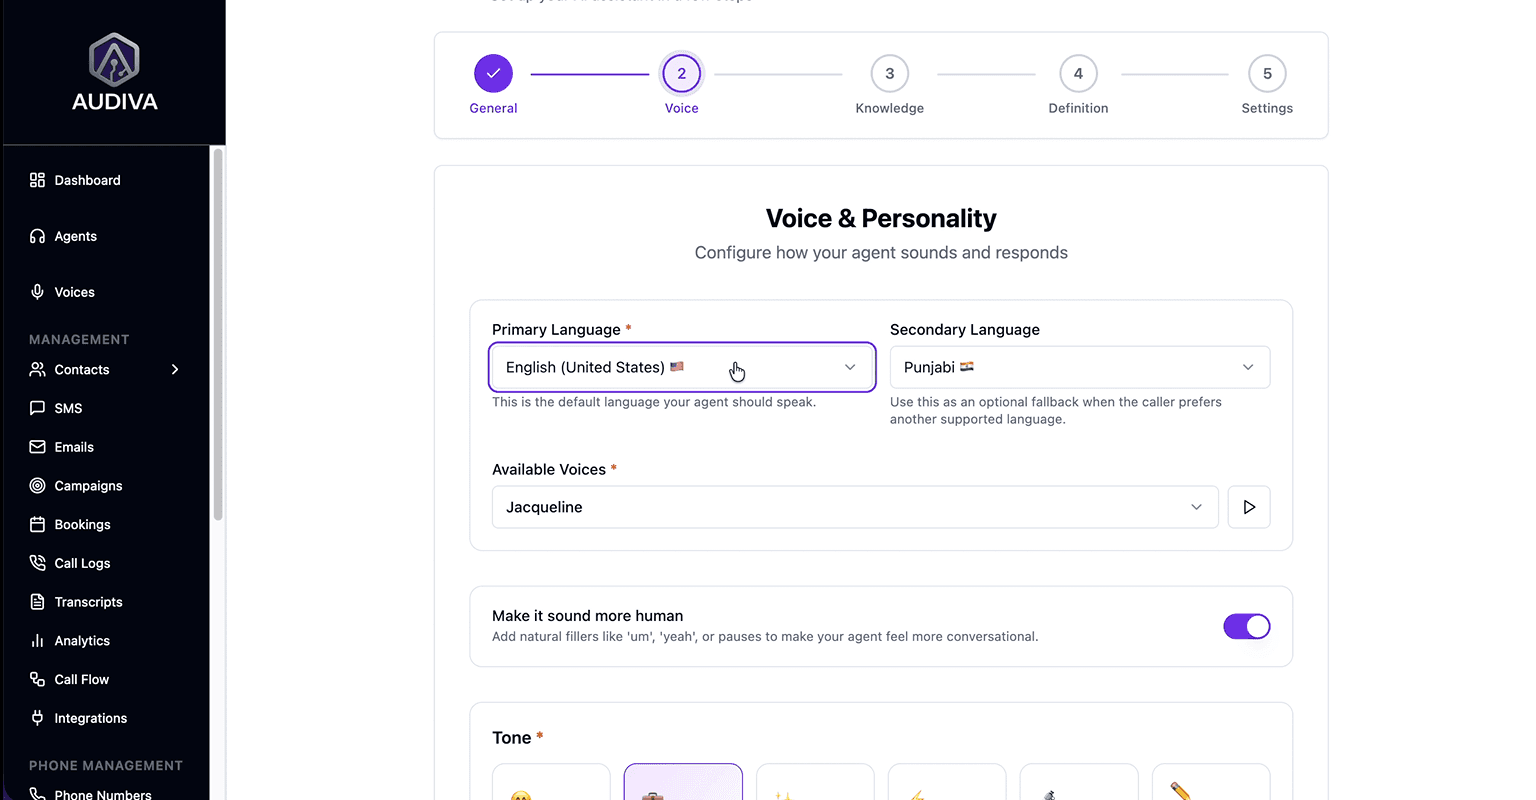
3. Step 3: Voice, Language, and Personality
Select the language your callers primarily speak, with the option to set a fall-back for multilingual audiences. Choose a voice from the available library. You can preview each before committing. The "make it sound more human" toggle is worth enabling: it introduces natural conversational fillers and micro-pauses, which research in human-computer interaction consistently links to greater caller comfort and trust. Finally, select a tonal register: Friendly, Professional, Clinical, Luxury, Energetic, or compose a bespoke description of how you want the agent to come across. You can also create a custom description.
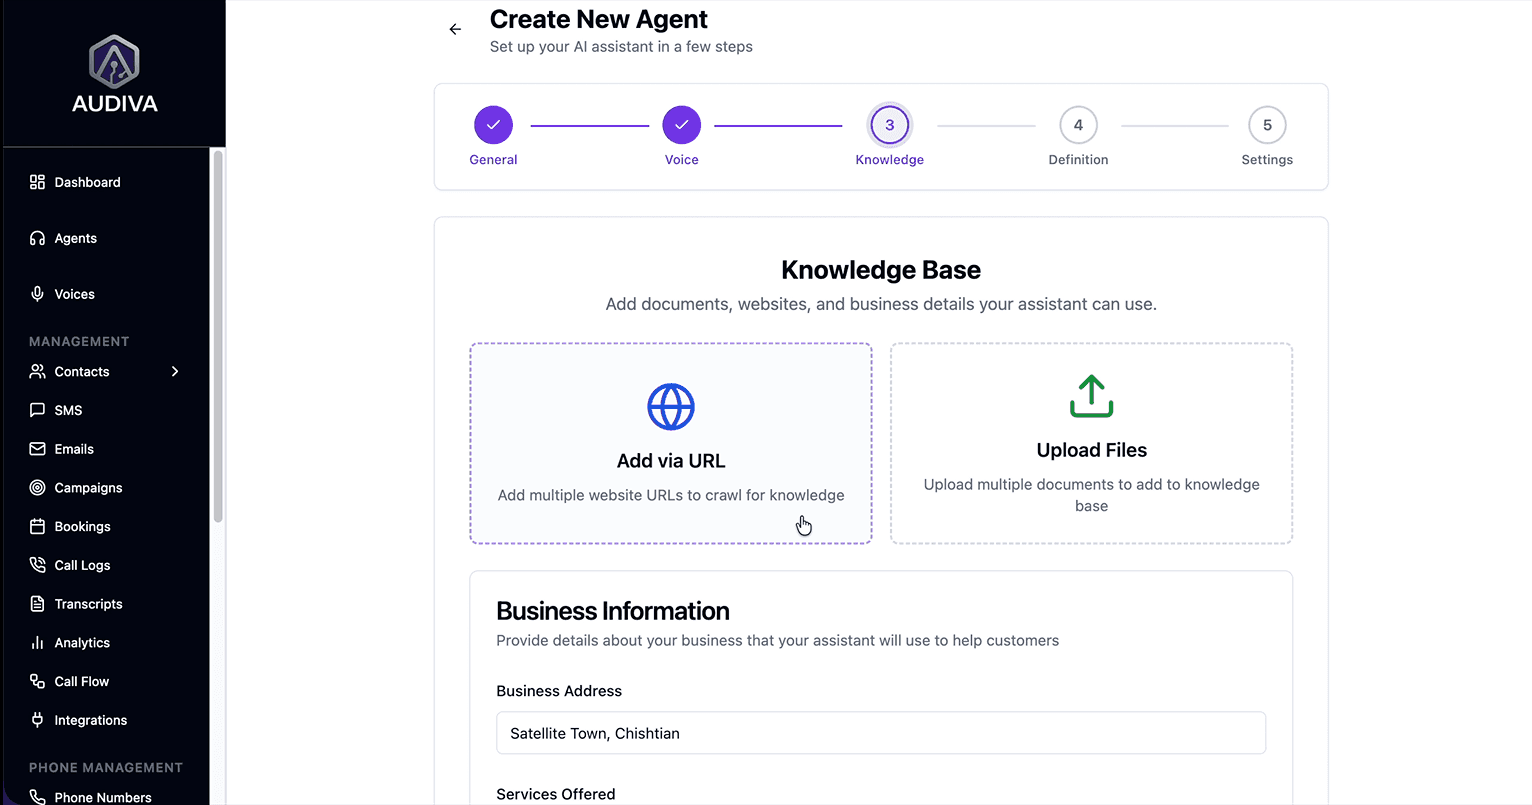
4. Step 4: Building the Knowledge Base
After finalizing the voice, build the knowledge base for your AI agent. This is the intellectual core of your agent. You can supply it with information in several ways: by entering URLs for the system to crawl and ingest, by uploading PDF or text documents, by manually inputting your address and a structured list of services with associated pricing, and by pre-loading a set of frequently asked questions paired with their answers. The richer and more precise the knowledge base, the more authoritative the agent sounds. Think of this step as briefing a new employee, except this one will retain every word, perfectly, indefinitely. Add common FAQs and their respective answers to ensure the agent is prepared for standard inquiries.
5. Step 5: Defining Objectives and Persona
Next, specify the agent's primary goal. If the goal is to answer questions and provide information, choose “Answer FAQs” for automated support, and if the goal is to convert enquiries into booked appointments, choose “Book Appointments” for scheduling.
Then choose the target persona, defining who it is speaking to, new prospective clients, existing customers, or both, so it can calibrate its approach accordingly. Then set strict limits on topics the agent should avoid or actions it must not take. The explicit list of topics it will not engage with and actions it will not perform. This is not merely a courtesy feature; it is an essential safeguard that keeps your agent on-brand and legally considered.
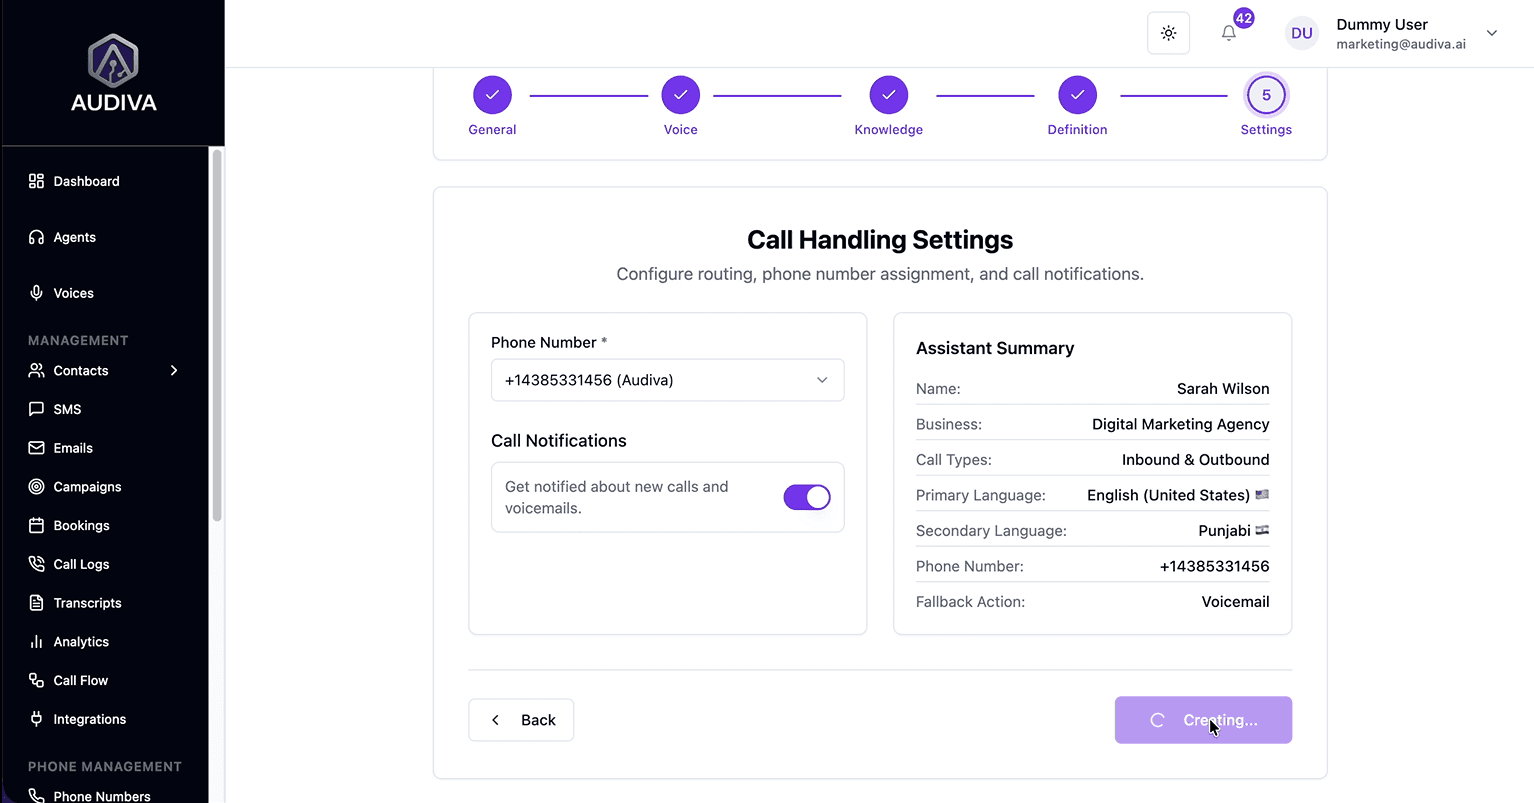
6. Step 6: Final Review and Deployment
In the end, before going live, the platform presents a summary of everything you've configured: the agent's identity, voice, knowledge, objectives, and assigned phone number. Enable call and voicemail notifications to maintain visibility into what your agent is fielding. When you're satisfied, click “Create Agent”. The system goes live. From that moment, your business has a voice that answers every time.
Conclusion
In sum, any business that is ready to transform its customer engagement can follow this guide to build its first AI agent today. Focus on using clear, instructional language that empowers the reader to navigate the dashboard with confidence.
How to Create an AI Voice Agent in Audiva.ai?
Frequently Asked Questions (FAQs)
What is the difference between inbound and outbound call types?
Inbound calls are those initiated by your customers and received by the agent, the classic receptionist function. Outbound calls are initiated by the agent on your behalf, typically for follow-ups, appointment reminders, or proactive customer outreach. Many businesses benefit from configuring the same agent to handle both, though the conversational scripts and objectives will differ considerably between the two modes.
How do I make the AI agent sound more natural?
Enable the "make it sound more human" setting during the voice configuration step. This introduces natural fillers, affirmations like "yeah" or "of course", and realistic micro-pauses between conversational turns. Additionally, selecting a tonal register that closely matches your brand personality (rather than defaulting to the most neutral option) tends to produce warmer, more contextually appropriate interactions.
What if I want the agent to focus only on scheduling?
During the Objectives step, simply set the primary goal to "Book Appointments." This orients the entire conversational architecture toward scheduling, guiding callers through the booking process rather than delivering open-ended informational responses. The two modes are not mutually exclusive; many agents are configured to answer questions and book appointments within the same interaction.
Are there limits on what the agent can talk about?
Absolutely. The boundary configuration exists precisely for this purpose. You can explicitly enumerate subjects the agent should decline to engage with, actions it should never take, and conversational territories it should redirect away from. This is particularly important for regulated industries, businesses with strict brand guidelines, or any context where an unguided AI response could create reputational or legal complications.
About The Author

Ibrahim
CEO/Founder


Background Story


Related Articles

features/24 7 Availability
Why Businesses That Answer First Win More Customers
Answer every call, day or night. Learn how AI call handling helps businesses respond faster, capture more leads, and convert more customers 24/7.
Ibrahim

features/24 7 Availability
The Hidden Cost of Missed Business Calls for a Business
Missed calls may cause significant revenue loss for a business. Thus, an AI receptionist is a must to handle all these missed calls with 24/7 automation to capture every lead.
Ibrahim

Ready to See Audiva in Action?
Reading about AI receptionists is one thing. Hearing one handle a real call is something else.


